January 26, 2026
How to Create a Shopify Mobile App with React Native: Complete Guide for 2026

More people shop on mobile than ever before – and for Shopify store owners, having a mobile app isn’t optional anymore, it’s essential.
A mobile app gives your customers a faster, more convenient way to browse and buy. It boosts engagement, improves retention, and keeps your store just a tap away.
With React Native, you can build a high-quality mobile app for both iOS and Android using just one codebase. It’s the same framework Shopify uses for its own apps, and it’s perfect for creating a smooth, modern shopping experience.
In this guide, you’ll learn how to create a React Native mobile app for your Shopify store – step by step, without the tech jargon. Just what you need to get it done.
Let’s get started!
Set up your development environment
Before creating your Shopify mobile app with React Native, it’s important to have the right knowledge and tools in place. Here’s what you need to get started:
1. Basic knowledge of React Native & JavaScript
You should be familiar with the basics of JavaScript and how React Native works. Understanding components, state management, and API integration will make the development process much smoother.
2. Required tools and software
Make sure the following tools are installed on your computer:
- Node.js: JavaScript runtime needed to run development scripts.
- React Native CLI: Command-line interface to create and manage React Native projects.
- Code editor: VS Code is a popular choice for working with React Native.
- Android Studio/Xcode: Required for testing and running your app on Android and iOS simulators.
3. Create a Shopify Partner account & development store
To integrate your app with Shopify:
- Sign up at Shopify Partners: This gives you access to tools, API credentials, and development stores.
- Create a development store: Use this store to build and test your app without any cost.
How to build React Native mobile app for your Shopify store: Step-by-step guide
Building a mobile app for your Shopify store with React Native involves multiple phases – from setup to deployment. Here’s a thorough instruction to help you build a functional, polished app:
Step 1: Configure Shopify APIs
To connect your React Native app with your Shopify store, you first need to generate a Storefront API access token. This token allows your app to fetch products, manage carts, and interact with Shopify data securely. Here’s how to get it:
- Log in to your Shopify Admin panel and scroll to the bottom of the left sidebar. Click on Settings.
- In the Settings menu, select Apps and sales channels, then click on Develop apps.
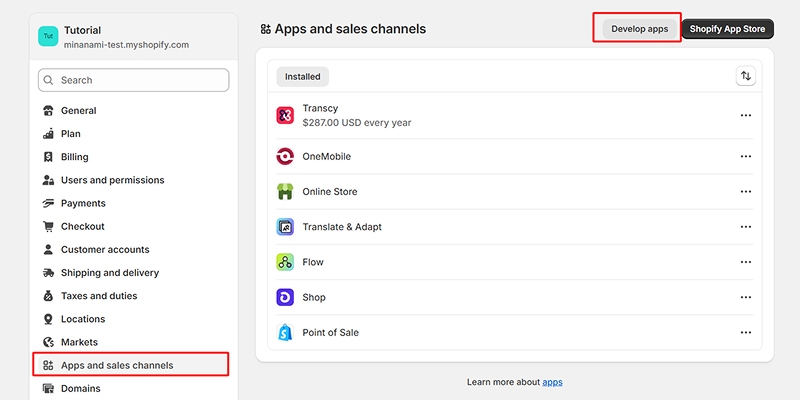
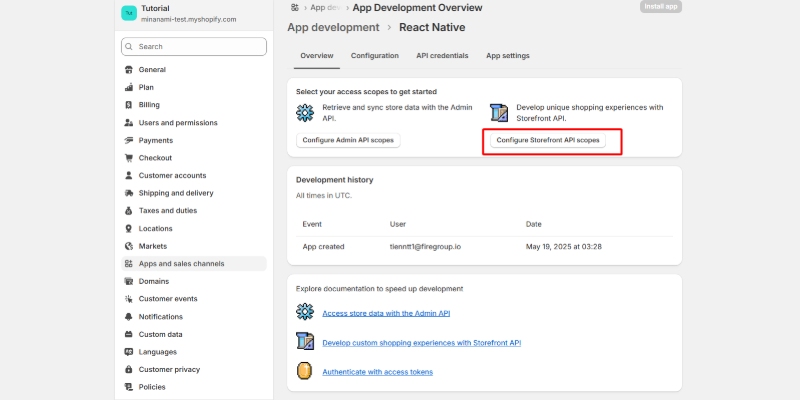
- Click Create an app, give it a name, and confirm. You’ll be taken to the app configuration page. From there, click Configure Storefront API scopes.
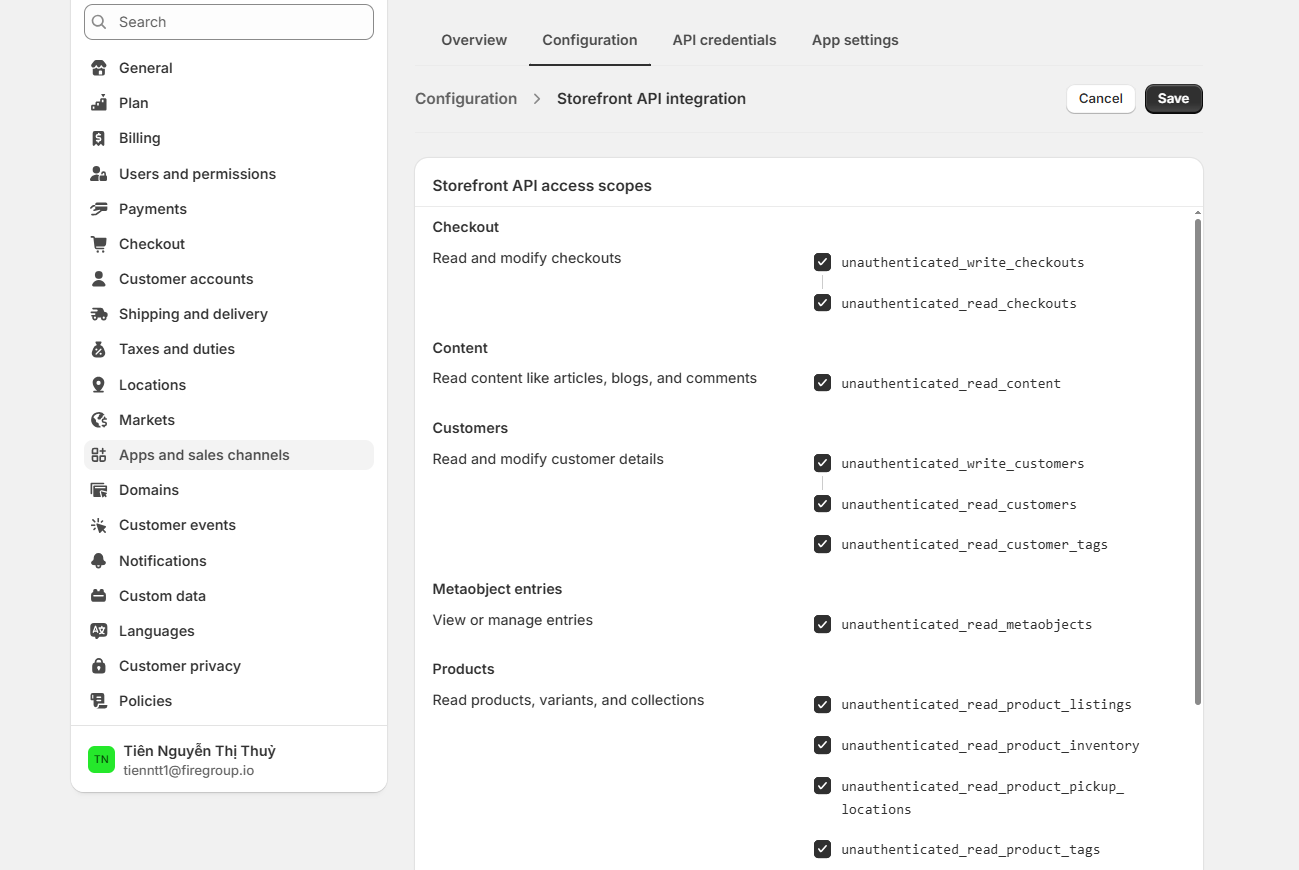
- In the API scopes section, choose the access levels your app needs, then click Save.
- Once you’re done, click Install app in the top right corner.
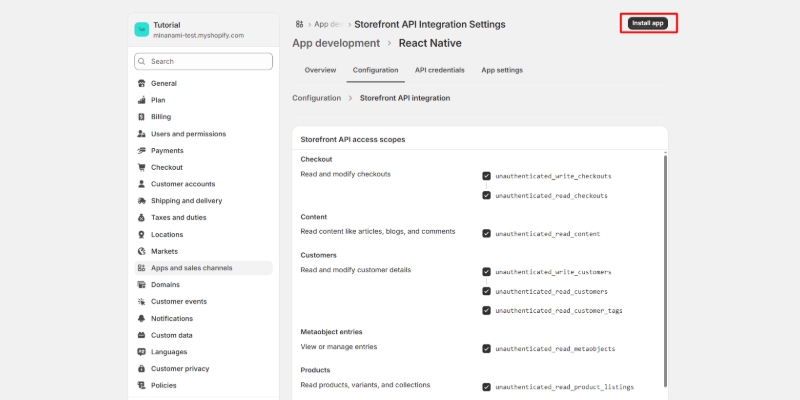
- After the app is installed, go to the API Credentials tab. There, you’ll find your Storefront API access token.
Step 2: Connect your React Native app to Shopify with the Buy SDK
Once your Shopify Storefront API is ready, the next step is to connect your React Native app to your Shopify store using the Shopify Buy SDK. This SDK makes it easy to fetch product data and interact with the Storefront API directly from your app.
1. Install the Shopify Buy SDK
To begin, install the SDK package in your project:
npm install shopify-buyOr, if you’re using Yarn:
yarn add shopify-buy2. Set up a Shopify utility file
Next, create a new file to organize your Shopify-related functions. This could be placed in a folder like src/shopify for better structure.
Here’s an example setup:
// Import the Shopify Buy SDK
import Client from 'shopify-buy';

// Initialize the Shopify client
const client = Client.buildClient({
  domain: 'your-domain',
  storefrontAccessToken: 'your-store-front-access-token'
});

// Fetch all products from your store
export async function fetchAllProducts() {
  return client.product.fetchAll();
}

// Fetch a single product by its ID
export async function fetchSingleProduct(productId) {
  return client.product.fetch(productId);
}
3. Use the functions in your components
You can now bring these functions into your React Native components to load product data. Here’s an example of how to fetch and display products within a component:
import { fetchAllProducts } from '../shopifyFunctions';

interface Product {
  id: string;
  title: string;
  images: { src: string }[];
}

const [products, setProducts] = useState<Product[]>([]);

useEffect(() => {
  const fetchData = async () => {
    try {
      const data = await fetchAllProducts();
      setProducts(data);
    } catch (error) {
      console.error('Error fetching products: ', error);
    }
  };
  fetchData();
}, []);
This setup connects your app to Shopify’s backend, allowing you to fetch and display product data dynamically, setting the stage for all your core eCommerce features.
Step 3: Display products in a list
After loading the product data into your component’s state, you’re ready to render it on screen. You can loop through the product list using .map() and create a simple UI for each item. In this example, we’ll display product information and use an onPress() handler to navigate to a product detail screen, passing the product ID as a parameter. We’ll also make sure to show a fallback image if the product doesn’t have one.
<SafeAreaView>
  <ScrollView>
    {products.map((product) => (
      <TouchableOpacity
        key={product.id}
        onPress={() => navigation.navigate('Details', { id: product.id })}
      >
        <Image
          source={{
            uri:
              product.images && product.images.length > 0
                ? product.images[0].src
                : fallbackImage,
          }}
        />
        <Text>{product.title}</Text>
        <Text>${product.variants[0].price}</Text>
      </TouchableOpacity>
    ))}
  </ScrollView>
</SafeAreaView>
);
};
export default ProductList;
Step 4: Display product details using product ID
Now that users can browse through the product list, it’s time to show more information when they tap on a specific item. By passing the product ID through navigation, we can fetch full details for that single product using the fetchSingleProduct() function we set up earlier.
This allows us to build a dedicated Product Detail screen that displays more in-depth information like images, description, and price.
import React, { useEffect, useState } from 'react';
import { View, Text, Image, ScrollView } from 'react-native';
import { fetchSingleProduct } from '../shopify/shopifyService'; // adjust path if needed

const fallbackImage =
  'https://st4.depositphotos.com/14953852/24787/v/450/depositphotos_247872612-stock-illustration-no-image-available-icon-vector.jpg';

const ProductDetail = ({ route }) => {
  const { id } = route.params;
  const [product, setProduct] = useState(null);

  useEffect(() => {
    const loadProduct = async () => {
      try {
        const data = await fetchSingleProduct(id);
        setProduct(data);
      } catch (error) {
        console.error('Error fetching product:', error);
      }
    };
    loadProduct();
  }, [id]);

  if (!product) {
    return <Text>Loading...</Text>;
  }

  const imageUrl =
    product.images && product.images.length > 0
      ? product.images[0].src
      : fallbackImage;

  return (
    <ScrollView>
      <Image source={{ uri: imageUrl }} />
      <Text>{product.title}</Text>
      <Text>{product.description}</Text>
      <Text>${product.variants[0].price}</Text>
    </ScrollView>
  );
};

export default ProductDetail;
📝 Notes:
- Ensure you’re passing the correct ID format when navigating from the product list.
- If your products have multiple variants (like size or color), consider showing variant options or a selection UI.
- This example intentionally avoids styling for simplicity. You can enhance readability and UI appeal with StyleSheet.create() or libraries like React Native Paper.
Step 5: Initialize checkout for cart management
Before you can handle items in a cart, you need to create a checkout session. This session contains all the transaction-related data such as products, pricing, taxes, and shipping information.
To make the shopping experience smoother and more consistent, it’s a good idea to store the checkout ID persistently, so it’s not lost if the user closes the app. You can do this using local storage tools like AsyncStorage or a state management library such as Redux. That way, the cart can be restored anytime the user returns.
1. Create a checkout function
Include the following function in your Shopify helper file. It creates a new checkout session and returns its unique ID for further use.
export async function createCheckout() {
  const checkout = await client.checkout.create();
  return checkout.id;
}
2. Store the checkout ID in state
You’ll want to save the checkout ID as soon as it’s created. Here’s an example using Redux:
import { createCheckout } from '../shopify/shopifyService';
import { useSelector, useDispatch } from 'react-redux';
import { selectCheckoutId, setCheckoutId } from '../redux/checkoutSlice';

const checkoutId = useSelector(selectCheckoutId);
const dispatch = useDispatch();

useEffect(() => {
  const initializeCheckout = async () => {
    if (!checkoutId) {
      const id = await createCheckout();
      dispatch(setCheckoutId(id));
    }
  };
  initializeCheckout();
}, []);
🔒 Why it matters: Storing the checkout ID lets you track the same cart across app sessions, allowing users to pick up where they left off, even after closing the app.
Step 6: Add a product to the cart
To enable cart functionality, the next step is to allow users to add products to their cart through the Shopify checkout. This involves using a function that interacts with Shopify’s API to add specific items.
1. Create the add-to-cart function
Start by defining a helper function that adds an item to an existing checkout session. Place this in your Shopify service file:
export async function addItem(checkoutId, item) {
  return client.checkout.addLineItems(checkoutId, item);
}
This function takes two arguments: the checkout ID, which identifies the user’s active cart, and an item object that contains product details to be added.
2. Use it in your product component
Now you’ll implement the addToCart() function in your product screen, where users can tap a button to add the selected item.
import { addItem } from '../shopify/shopifyService';
import { useSelector } from 'react-redux';
import { selectCheckoutId } from '../redux/checkoutSlice';

const checkoutId = useSelector(selectCheckoutId);

const addToCart = async () => {
  const item = {
    variantId: product.variants[0].id, // Shopify API requires variant ID
    quantity: parseInt(quantity), // Convert quantity to a number
  };

  try {
    const result = await addItem(checkoutId, item);
    console.log('Item added to cart:', result);
  } catch (error) {
    console.error('Failed to add item:', error);
  }
};
📝 Notes:
- Shopify uses variants, not general product IDs. Even if the product has no variations, you still need to use its first variant.
- The quantity must be a number (e.g., 1, 2, etc.).
- Make sure checkoutId is already initialized before calling this function. If not, you should run your checkout creation logic first.
Step 7: Display items in the cart
Now that products can be added to the cart, it’s time to build a Cart Screen that shows everything currently in the user’s Shopify checkout session. This includes product titles, quantities, and the total price.
Here’s how you can structure the Cart component to load and display cart items:
import React, { useEffect, useState } from 'react';
import { View, Text, ScrollView, SafeAreaView } from 'react-native';
import { Picker } from '@react-native-picker/picker'; // Install if not already added
import { fetchCheckout } from '../shopify/shopifyService';
import { useSelector } from 'react-redux';
import { selectCheckoutId } from '../redux/checkoutSlice';

const Cart = () => {
  const [cart, setCart] = useState(null);
  const checkoutId = useSelector(selectCheckoutId);
  const quantityOptions = Array.from({ length: 100 }, (_, i) => i);

  useEffect(() => {
    const loadCart = async () => {
      try {
        const data = await fetchCheckout(checkoutId);
        const cartData = {
          id: data.id,
          items: data.lineItems.map((item) => ({
            id: item.id,
            title: item.title,
            quantity: item.quantity,
          })),
          price: data.totalPrice.amount,
        };
        setCart(cartData);
      } catch (error) {
        console.error('Error loading cart:', error);
      }
    };
    loadCart();
  }, []);

  return (
    <SafeAreaView>
      <ScrollView>
        <View>
          <Text>Product</Text>
          <Text>Quantity</Text>
        </View>
        {cart?.items.map((item) => (
          <View key={item.id}>
            <Text>{item.title}</Text>
            <Picker
              selectedValue={item.quantity}
              onValueChange={(value) => {
                updateQuantity(item.id, value); // This function will be defined in the next step
              }}
            >
              {quantityOptions.map((number) => (
                <Picker.Item
                  key={number}
                  label={number.toString()}
                  value={number}
                />
              ))}
            </Picker>
          </View>
        ))}
      </ScrollView>
      <View>
        <Text>TOTAL</Text>
        <Text>{cart?.price} €</Text>
      </View>
    </SafeAreaView>
  );
};

export default Cart;
Step 8: Update product quantity in the cart
Let’s complete the cart functionality by allowing users to adjust the quantity of items directly from the Cart screen. This step involves writing the updateQuantity() function, which communicates with the Shopify API to update the checkout session with the new quantity.
📌 Why it matters: Changing item quantities in the cart is a basic but essential part of the eCommerce experience. Without it, users would need to remove and re-add products just to fix a quantity, leading to friction and frustration.
With Shopify’s API, cart items are managed as line items within a checkout session, and each one has a unique lineItem.id that we use to modify it.
1. The updateQuantity() function
Add this logic inside your Cart component or in your Shopify service file, depending on how you structure your code:
import { client } from '../shopify/shopifyService'; // Ensure client is exported and reused

export async function updateCartItemQuantity(checkoutId, lineItemId, quantity) {
  const updatedLineItems = [
    {
      id: lineItemId,
      quantity: parseInt(quantity),
    },
  ];

  const updatedCheckout = await client.checkout.updateLineItems(checkoutId, updatedLineItems);
  return updatedCheckout;
}
2. Use the function in your cart component
Now integrate this function with the quantity <Picker> in your Cart screen:
import { updateCartItemQuantity } from '../shopify/shopifyService';

const updateQuantity = async (lineItemId, newQuantity) => {
  try {
    const updated = await updateCartItemQuantity(checkoutId, lineItemId, newQuantity);
    const updatedCart = {
      id: updated.id,
      items: updated.lineItems.map((item) => ({
        id: item.id,
        title: item.title,
        quantity: item.quantity,
      })),
      price: updated.totalPrice.amount,
    };
    setCart(updatedCart); // Refresh UI with new data
  } catch (error) {
    console.error('Failed to update quantity:', error);
  }
};
Step 9: Remove items from the cart when quantity is zero
In any shopping experience, users expect to have full control over their cart, including the ability to remove items they no longer want. In Shopify’s system, this is handled by removing the corresponding line item from the checkout, not by setting its quantity to zero.
To make your cart more user-friendly and complete, we’ll update the quantity-change logic so that when a user selects 0 as the quantity, the item is automatically removed from the cart.
This creates a smooth, intuitive experience and ensures that the cart reflects only what the customer really wants to purchase.
Add this improved version of the function to your Cart component:
import {
  updateCartItemQuantity,
  removeCartItem,
} from '../shopify/shopifyService';

const updateQuantity = async (lineItemId, newQuantity) => {
  try {
    let updated;
    if (parseInt(newQuantity) === 0) {
      // Remove the item from checkout if quantity is 0
      updated = await removeCartItem(checkoutId, lineItemId);
    } else {
      // Otherwise, update the quantity
      updated = await updateCartItemQuantity(checkoutId, lineItemId, newQuantity);
    }

    // Update local cart state with the response
    const updatedCart = {
      id: updated.id,
      items: updated.lineItems.map((item) => ({
        id: item.id,
        title: item.title,
        quantity: item.quantity,
      })),
      price: updated.totalPrice.amount,
    };

    setCart(updatedCart);
  } catch (error) {
    console.error('Error updating quantity or removing item:', error);
  }
};
You’ll also need to define the removal logic in your Shopify utility file:
export async function removeCartItem(checkoutId, lineItemId) {
  const updatedCheckout = await client.checkout.removeLineItems(checkoutId, [lineItemId]);
  return updatedCheckout;
}
Step 10: Complete the checkout with Shopify WebView
The final step in your mobile shopping experience is to complete the transaction. Fortunately, Shopify handles the entire payment flow securely, so you don’t need to manage sensitive data like credit card information within your app.
How checkout works with Shopify
When a checkout session is created through Shopify’s API, it includes a webUrl – a special link that contains everything the user added to their cart: products, quantities, prices, taxes, and more.
This URL leads to Shopify’s hosted checkout page, where customers can securely enter their shipping and payment details and place their order. Since it’s managed by Shopify, you can trust that the transaction is secure and compliant.
To keep the experience inside your app, you’ll load this checkout page using React Native WebView, which renders web content within your mobile app interface.
1. Install React Native WebView
If you haven’t already, install the package:
npm install react-native-webview2. Add webUrl to your cart state
In your Cart component, update the cart object to store the checkoutUrl:
const newCart = {
  id: data.id,
  items: data.lineItems.map((lineItem) => ({
    id: lineItem.id,
    title: lineItem.title,
    quantity: lineItem.quantity,
  })),
  price: data.totalPrice.amount,
  checkoutUrl: data.webUrl, // <-- this is the URL for the Shopify-hosted checkout
};
3. Navigate to the Checkout Screen
Use your existing Pay button to navigate to the WebView screen, passing the checkout URL as a parameter:
<TouchableOpacity
  onPress={() => {
    navigation.navigate('Checkout', { uri: cart?.checkoutUrl });
  }}
>
  <Text>Pay</Text>
</TouchableOpacity>
4. Create the WebView checkout component
Now create the screen that loads Shopify’s checkout page using the WebView component:
import React from 'react';
import { WebView } from 'react-native-webview';

const WebViewScreen = ({ route }) => {
  const { uri } = route.params;
  return <WebView source={{ uri }} />;
};

export default WebViewScreen;
What happens now:
- The customer taps Pay.
- They’re taken to a Shopify-hosted checkout page inside your app via WebView.
- From there, they can enter shipping info, choose payment methods, and complete their purchase.
- You stay out of handling payment data; Shopify handles it securely.
Testing and deployment
Before releasing your Shopify mobile app to users, it’s essential to thoroughly test its functionality and then properly deploy it to the app stores. This step ensures a smooth user experience and helps you catch potential issues early.
1. Test your React Native app
To ensure your app behaves as expected, test both individual components and how they work together.
Recommended testing tools:
- Jest: A JavaScript testing framework used for unit testing your logic and functions.
- React Native Testing Library: Useful for testing UI components by simulating user interactions (e.g., button presses, navigation, input changes).
What to test:
- Product loading and rendering
- Add-to-cart functionality
- Quantity updates and item removal
- Checkout flow via WebView
- Navigation between screens
- Handling empty states or errors
Add both unit and integration tests to ensure components work well on their own and in combination.
2. Deploy to App Stores
Once your app is fully tested and stable, you can package and release it on the Google Play Store and Apple App Store.
Google Play Store
- Create a developer account: Sign up at Google Play Console ($25 one-time charge).
- Generate a signed APK or AAB: Use Android Studio or React Native CLI to generate a release build (.aab is recommended for Play Store).
- Prepare assets: Upload your app icon, screenshots, feature graphics, and fill in the store listing (description, pricing, etc.).
- Publish: Submit your app for review. Google usually reviews apps within a few hours to a couple of days.

Apple App Store
- Enroll in the Apple Developer Program: Sign up at Apple Developer Program ($99/year).
- Use Xcode to archive and upload: Generate a release build and upload via Xcode.
- Prepare app store listing: Add app name, description, keywords, screenshots, and privacy details in App Store Connect.
- Submit for review: Apple’s review process may take 1–3 days or more, depending on app complexity.

Why React Native for your Shopify app?
Choosing the right technology for your mobile app is key to its success – and React Native stands out as one of the best options for Shopify store owners. Here’s why:
- Reach everyone, easily:
With React Native, you write a single codebase that works on both iOS and Android. This means faster development and lower maintenance, without needing two separate teams for each platform.
- Smooth, native-like experience:
React Native apps feel just like native apps. Users get fast performance, smooth animations, and intuitive interactions – everything they expect from a high-quality mobile experience.
- Save time and money:
Since you’re only building one app instead of two, your time to market is shorter and development costs are reduced. It’s a smart choice for growing Shopify businesses looking to scale efficiently.
- Plenty of help when you need it:
React Native has a large and active developer community, which means more tutorials, open-source tools, and support when you need help or want to extend your app’s features.
- Works perfectly with Shopify:
Using tools like the Shopify Buy SDK, React Native connects smoothly with Shopify’s backend. You can easily fetch products, handle checkout, and manage customer data – all through Shopify’s APIs.

Key features to include in your Shopify React Native app
To deliver a smooth, engaging, and competitive shopping experience, your Shopify mobile app should offer both essential eCommerce functions and standout advanced features. Here’s a breakdown of what to include:
Core features (Must-haves)
These are the essential functions that make your app usable, intuitive, and effective:
- Product browsing and filtering: Allow users to explore your catalog easily with search, categories, and smart filters.
- Detailed product pages: Include high-quality images, descriptions, reviews, and related product recommendations.
- Shopping cart functionality: Let customers view, update, and manage items before checkout.
- User authentication and account management: Provide options to sign up, log in, and manage user profiles, wishlists, and addresses.
- Secure checkout with multiple payment options: Support major payment gateways like Shopify Payments, PayPal, Apple Pay, etc.
- Order tracking and history: Let users track their orders in real-time and view past purchases.
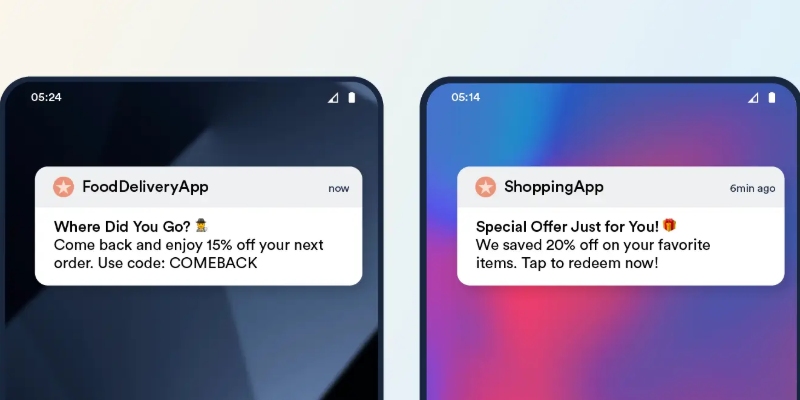
- Push notifications: Engage customers with alerts for promotions, cart reminders, order status updates, and more.
- Customer support integration: Add chat, email, or call support options for a better post-sale experience.
Advanced features (To stand out)
To differentiate your app and delight users, consider these powerful enhancements:
- Augmented Reality (AR): Let customers visualize products in their real environment, especially useful for fashion, furniture, and decor.
- Voice search and commands: Make it easy to find products hands-free using natural voice queries.
- Personalized recommendations: Suggest items based on browsing behavior and purchase history.
- Wishlists: Enable users to save favorite products for later.
- Social media integration: Allow sharing, logins, and promotions via platforms like Facebook, Instagram, and TikTok.
- Geolocation-based features: Show nearby store locations or run location-targeted promotions.
- In-app chatbots: Provide instant answers to FAQs and guide users through shopping or checkout.
- Multi-currency & multi-language support: Make your app accessible to global customers with localized experiences.
- Offline functionality: Allow browsing or viewing previously loaded products without an internet connection.
- IoT integration: Explore smart product controls for connected devices (e.g., smart home gadgets).
- Subscription models: Support recurring purchases or membership-based services with flexible plans.
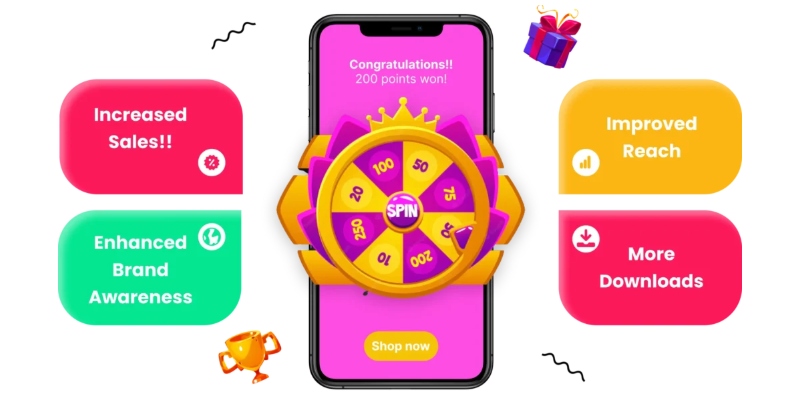
- Gamification: Add reward systems, badges, or mini-games to keep users engaged and increase retention.
Final thoughts
Building a React Native mobile app for your Shopify store is a smart way to grow your business in today’s mobile-first world. With just one codebase, you can deliver a smooth, high-performance experience on both iOS and Android.
In this guide, you’ve learned how to:
- Connect your app to Shopify using the Storefront API and Buy SDK
- Build key features like product listings, cart, and checkout
- Test your app and publish it to app stores
Thanks to Shopify’s secure hosted checkout, you don’t have to handle sensitive payment data, making development faster and safer.
💡 Prefer not to build from scratch?
If you want to skip the coding entirely, try a Shopify mobile app builder like OneMobile. Just drag and drop to design your app – we handle the tech, so you can focus on growing your business while saving time and money.
Either way, your mobile commerce success starts here. Let’s build it!
Table of Contents
Table of Contents
Read more articles
Top 11 Shopify Mobile App Builders in 2026: Features, Pricing & Reviews
By Thuan Do
February 3, 2026
OneMobile is Built for Shopify: A Mark of Excellent Quality
By OneMobile Team
February 2, 2026


